Read Sharp VC-S2000 (serv.man19) User Guide / Operation Manual online
20
If problems persist contact the SHARP Helpline on tel: 08705-274277 (office hours)
or www.sharp.co.uk/support
ADVANCED OPERATION
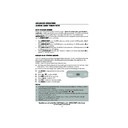
AUDIO AND YOUR VCR
HI-FI STEREO SOUND
Stereo sound is possible from this VCR if you have a stereo TV connected to the VCR with a
scart lead, or audio equipment connected with audio phono leads. The VCR is normally set
so that stereo sound is possible. The sound output from the VCR is controlled by the
scart lead, or audio equipment connected with audio phono leads. The VCR is normally set
so that stereo sound is possible. The sound output from the VCR is controlled by the
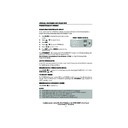
AUDIO OUT
button on the remote control. If you wish to change the sound output you can
use the
AUDIO OUT
button as follows:
•
Press
AUDIO OUT
once. The LEFT audio channel will be sent to BOTH speakers.
L
will
appear on the VCR display.
•
Press
AUDIO OUT
twice. The RIGHT audio channel will be sent to BOTH speakers.
R
will
appear on the VCR display.
•
Press
AUDIO OUT
three times. The MONO track will be sent to BOTH speakers.
L
and
R
will disappear from the VCR display.
•
Pressing
AUDIO OUT
a fourth time, normal Hi-Fi stereo sound will be heard.
L
and
R
will
appear on the VCR display.
NICAM Hi-Fi STEREO SOUND
Your VCR can receive and record programmes broadcast in NICAM sound (the factory pre-
set condition for NICAM is AUTO). NICAM sound may not be stereo, this depends on the
programme being received.
set condition for NICAM is AUTO). NICAM sound may not be stereo, this depends on the
programme being received.
Audio is automatically recorded in two different ways:
(i) Hi-Fi: Using specialised rotary heads, two audio signals are recorded on to the tape. These
will be stereo, mono or bilingual depending on the sound being received.
will be stereo, mono or bilingual depending on the sound being received.
(ii) Normal: A mono recording is also made on the conventional analogue audio track.
4.
Press
MENU
to display the main menu on the
screen.
5.
Press [
/
] to select MODE.
6.
Press
SET
. NICAM will be selected.
7.
Press
[
/
] to select OFF.
8.
Press
SET
, to return to the menu screen.
9.
Press
MENU
, to exit to normal screen.
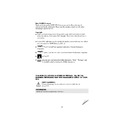
NOTES:
•
If the tape being played back does not carry sound recorded on Hi-Fi tracks, L and R
will not appear on the display.
will not appear on the display.
•
lf the sound contains ‘crackling’ or ‘popping’ noises the sound quality may be
improved by adjusting the tracking using CHANNEL
improved by adjusting the tracking using CHANNEL
/
.
•
If the poor quality is for a long period the VCR will automatically select the mono track
and the sound will be in mono.
and the sound will be in mono.
•
Not all TV transmitters provide NICAM sound. In this case the VCR automatically
switches to receive the mono signal.
switches to receive the mono signal.
•
NICAM sound may not be stereo.
➝
N I CAM
AU T O
O F F
CO L OUR
AU T O
P A L
TINS-3894 ENGLISH.book Page 20 Wednesday, September 6, 2000 11:53 AM
21
If problems persist contact the SHARP Helpline on tel: 08705-274277 (office hours)
or www.sharp.co.uk/support
ADVANCED OPERATION
AUDIO AND YOUR VCR
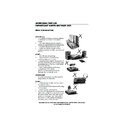
CONNECTING TO AUDIO EQUIPMENT
The diagram below shows how to connect your VCR to audio equipment. When connected
in this way stereo sound is possible from the speakers.
in this way stereo sound is possible from the speakers.
RF OUT
SORTIE ANTENNE
ANTENNA IN
ENTREE ANTENNE
G
D
S-VIDEO OUT
SORTIE SON S-VIDEO
+
BACK OF
EXISTING AERIAL
CABLE
RF CONNECTION CABLE
RF-OUT
AUDIO OUT
AMPLIFIER
L and R
TELEVISION
AERIAL IN
AUDIO PHONO LEADS
(NOT SUPPLIED)
S-VIDEO CABLE
TINS-3894 ENGLISH.book Page 21 Wednesday, September 6, 2000 11:53 AM
22
If problems persist contact the SHARP Helpline on tel: 08705-274277 (office hours)
or www.sharp.co.uk/support
ADVANCED OPERATION
AUDIO DUBBING
RECORDING SOUND ON TO A VIDEO TAPE (AUDIO DUBBING)
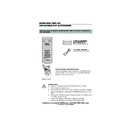
This feature enables you to add narration or background music to a pre-recorded tape.
•
The audio signal will be recorded on the mono track. The Hi-Fi track will remain
unchanged..
unchanged..
1.
Connect the audio source to the AUDIO
IN L-R terminals on the front of the VCR as
shown above.
IN L-R terminals on the front of the VCR as
shown above.
2.
Insert the pre-recorded tape into the
VCR.
VCR.
3.
Press
PLAY/X2
(
) to view the
recording.
4.
If you wish to listen to the original Hi-Fi
track while you are recording the new
dubbed audio track you will need to set
AUDIO MIX to ON in the mode menu.
track while you are recording the new
dubbed audio track you will need to set
AUDIO MIX to ON in the mode menu.
5.
Press
PAUSE/STILL
(
) when you
reach the point on the tape where you
want audio dubbing to start.
want audio dubbing to start.
6.
Press
A.DUB
(
A.DUB
will be shown on
your TV)
NOTE:
The input source will be
automatically changed to L3 (Front
phono jacks)
phono jacks)
7.
Press
PAUSE/STILL
(
) , to start audio
dubbing.
8.
Press
STOP
(
) , to finish audio dubbing
(
A.DUB
will disappear from your TV)
+
Connect your
audio equipment
to AUDIO IN L-R
terminals on the
front of your VCR.
audio equipment
to AUDIO IN L-R
terminals on the
front of your VCR.
If a microphone is to be used,
connect it to your audio
equipment
connect it to your audio
equipment
AUDIO SOURCE
II A. DUB
L3
SP
TINS-3894 ENGLISH.book Page 22 Wednesday, September 6, 2000 11:53 AM
23
If problems persist contact the SHARP Helpline on tel: 08705-274277 (office hours)
or www.sharp.co.uk/support
ADVANCED OPERATION
AUDIO DUBBING
PLAYING BACK AN AUDIO DUBBED TAPE
•
If you want to listen to the original and the new dubbed audio signal simultaneously, you will
need to set AUDIO MIX to ON.
need to set AUDIO MIX to ON.
•
You can change the audio output by pressing the AUDIO OUT button on the remote
control. Refer to the table below.
control. Refer to the table below.
1.
Press
MENU
, to display the main menu
on the screen.
2.
Press [
/
to select MODE.
3.
Press
SET
.
4.
Press [
/
] to select AUDIO MIX.
5.
Press [
/
] to select ON.
6.
Press
SET
, to return to the menu screen.
7.
Press
MENU
, to exit to the normal screen.
NOTES: .
AUDIO MIX
AUDIO OUT MODE
VCR DISPLAY
RESULT
ON
Hi-Fi and Mono audio
Original Hi-Fi audio (L&R
channels) and dubbed audio
Original Hi-Fi audio (L channel)
plus dubbed audio
Original Hi-Fi audio (R channel)
plus dubbed audio
•
Do not start audio dubbing until AUTO or MANUAL tracking has been completed as the
audio signal will not be recorded correctly.
audio signal will not be recorded correctly.
•
Because the audio signal is recorded onto the mono track any previous recording on
this track will be erased.
this track will be erased.
•
If AUDIO MIX in the mode menu is set to OFF, no sound will be heard during audio
dubbing.
dubbing.
AUDIO MIX
ON
OF F
16: 9
AUTO
OF F
POWERS AVE
ON
OF F
▲
▲
2/ 2
▲
▲
▲▼ :SELECT
:CHANGE
SET
:ENTER
MENU
:EXIT
MODE MENU SCREEN
▲
▲
➞
TINS-3894 ENGLISH.book Page 23 Wednesday, September 6, 2000 11:53 AM

