Read Sharp LC-39LD145K (serv.man2) User Guide / Operation Manual online
4
3
2
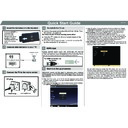
Insert the batteries into the handset
Connect antenna/cable to your TV
Connect the TV to the mains socket
5
HDMI input
To switch the TV on
6
Start Auto Setup procedure
PLEASE ENSURE BOTH UNITS ARE SWITCHED OFF BEFORE
CONNECTING. Use a HDMI to HDMI cable to connect the two units together.
To select the HDMI input, press the SOURCE button on the remote control.
Each time it is pressed, the on-screen menu confirms your selection.
CONNECTING. Use a HDMI to HDMI cable to connect the two units together.
To select the HDMI input, press the SOURCE button on the remote control.
Each time it is pressed, the on-screen menu confirms your selection.
To HDMI connection on
the device
1
Quick Start Guide
Insert two AAA/R3 or
equivalent type
batteries inside.
Observe the correct
polarity (+/-) when
inserting batteries and
replace the battery
cover.
equivalent type
batteries inside.
Observe the correct
polarity (+/-) when
inserting batteries and
replace the battery
cover.
IMPORTANT: Ensure that the signal is connected and a Common
Interface module is not inserted before switching on the TV for the first
time installation. Do not insert a common interface module during the
search process.
Interface module is not inserted before switching on the TV for the first
time installation. Do not insert a common interface module during the
search process.
1. When the TV is turned on for the first time the language screen will be
displayed. Select the desired language using Up or Down button and press
OK to save and continue.
OK to save and continue.
2. After setting the language, First Time Installation screen wil be displayed.
Use Up/Down and Left/Right buttons to set the desired options.
3. Press OK button on the on the remote control to continue and “Please
select digital search type” screen will be displayed.You must select a
search type to search and store broadcasts from the desired source.
search type to search and store broadcasts from the desired source.
Aerial Installation: If you select AERIAL option from the Search Type
screen, the television will search for digital terrestrial TV
broadcasts.After all the available stations are stored, Channel List will
be displayed on the screen. If you like to sort channels, according to the
LCN(*), please select “Yes” and then press OK. (*) LCN is the Logical
Channel Number system that organizes available broadcasts in
accordance with a recognizable channel sequence.
Cable Installation: If you select CABLE option and press OK button on the
remote control to continue, a confirmation message will be displayed on
the screen. Select YES to continue.
the screen. Select YES to continue.
You can select frequency ranges from this screen. You can enter the
frequency range manually by using the numeric buttons on the remote
control. Set Start and Stop Frequency as desired by using numeric buttons
on the remote control. After this operation, you can set Search Step as
8000 KHz or 1000 Khz. If you select 1000 KHz, the TV will perform search
process in a detailed way. Searching duration will thus increase
accordingly. When fi nished, press OK button to start automatic search.
TheTV will search and store available broadcasts.
ENGLISH
1. Switch the “
” button to position “|” so the TV will switch to
standby mode. Then the standby LED lights up.
To switch on the TV from standby mode either:
2. Press the “
” button,
or a numeric button on the remote
control.
3. Press the “ ” or
button on the TV.
P+ / P-
+ / -
By either method the TV will switch on.
SPDIF
VGA
H
D
M
I2
Antenna or cable
1. Connect the power cord to the 220-240V AC, 50 Hz. Then
the standby LED lights up.
To switch on the TV from standby mode either:
2. Press the “
” button,
or a numeric button on the
remote control or;
3. Press the control switch located on the left side of the TV.
P+ / P-
By either method the TV will switch on.
...and switch on
insert plug...
UK plug
7
Connect a USB memory stick to your TV
Quick Start Guide
IMPORTANT: To record a programme, you should ? rst connect
a USB memory disk to your TV while the TV is switched off. You
should then switch on the TV to enable recording feature.
Otherwise, recording feature will not be available.
a USB memory disk to your TV while the TV is switched off. You
should then switch on the TV to enable recording feature.
Otherwise, recording feature will not be available.
CAUTION !
• Quickly plugging and unplugging USB devices, is a very
hazardous operation. Especially, do not repeatedly quickly plug
and unplug the drive. This may cause physical damage to the
USB player and especially the USB device itself.
• Do not pull out USB module while playing or recording a file.
• Quickly plugging and unplugging USB devices, is a very
hazardous operation. Especially, do not repeatedly quickly plug
and unplug the drive. This may cause physical damage to the
USB player and especially the USB device itself.
• Do not pull out USB module while playing or recording a file.
IMPORTANT: The TV supports only FAT32 and NTFS disk
formatting. However, NTFS format is not supported for
recording features. For recording, if you connect a USB disk
with NTFS format, the TV will ask you to format the content. See
the section, “Format Disk” in the instruction book for more
information on disk formatting.
formatting. However, NTFS format is not supported for
recording features. For recording, if you connect a USB disk
with NTFS format, the TV will ask you to format the content. See
the section, “Format Disk” in the instruction book for more
information on disk formatting.
9
8
Instant Recording
Record OSD will then be displayed for a short time and the current
event will be recorded. You can press
event will be recorded. You can press
(RECORD) button on the
Press
Select Yes by using Left or Right and OK
following
will be displayed.
OSD
In the main menu, use Left or Right buttons to select Media
Browser. Highlight Recordings Library item by using Left or
Right button and press OK button to enter. Recordings
Library will then be displayed.
Browser. Highlight Recordings Library item by using Left or
Right button and press OK button to enter. Recordings
Library will then be displayed.
Select a recorded item from the list (if previously recorded) by
using Up or Down button. Press OK button to view Play
Options.
Select an option by using Up or Down and OK buttons.
using Up or Down button. Press OK button to view Play
Options.
Select an option by using Up or Down and OK buttons.
Note: Viewing main menu and menu items will not be available
during the playback.
Press
during the playback.
Press
(STOP) button to stop a playback and return to return
to Recordings Library.
Programme Playback
ENGLISH
50266298
Display

722.jpg)
263.jpg)
113.jpg)
158.jpg)
404.jpg)
