Read Sharp LC-32P55E (serv.man10) Service Manual online
18
LC-26GA5E
LC-32GA5E
LC-26P55E
LC-32P55E
LC-37P55E
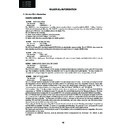
The adjustment values are set to their optimum at the factory before shipping. If by any chance a value should become
improper or a readjustment is required due to part replacement, make an adjustment according to the following proce-
dure.
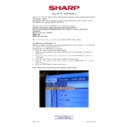
1 Entering and exiting the adjustment process mode
1- Unplug the AC power cord of TV set to force power off.
2- While holding down the “VOL (–)” and “INPUT” keys on the set at once, plug in the AC power cord to turn on the
set. The letter K appears on the screen: “K” color guide:
3- Next, hold down the “VOL (—)” and “P (—)” keys on the set at once. Multiple lines of orange characters appear ing
onscreen indicate that the set is now in the adjustment process mode. If you fail to enter the adjustment process
mode (the display is the same as normal startup), retry the procedure.
4- To exit the adjustment process mode after the adjustment is done, unplug the AC power cord to force off the
power. (When the power is turned off with the remote controller, once unplug the AC power cord and plug it in
again. In this case, wait 10 seconds or so before plugging.)
2 Remote Controller Key Operation and Description of Display in Adjustment Process Mode
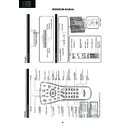
2.1 Key operation
Remote controller key
Main unit key
Function
P (Λ / V)
P (Λ / V)
Moving an item (line) by one (UP/DOWN)
VOL (+/-)
VOL (+/-)
Changing a selected item setting (+1/-1)
Cursor (UP / DOWN)
————
Turning a page (PREVIOUS / NEXT)
Cursor (LEFT / RIGHT)
————
Changing a selected line setting (+10/-10)
INPUT SOURCE
on remote controller
INPUT button
Input source switching (toggle switching)
(TV → EXT1 → EXT2 → EXT3 → EXT4 → EXT5)
(Not Operative)
OK
————
Executing a function
Input mode is switched automatically when relevant adjustment is started so far as the necessary input signal
available.
2.2 Description of display
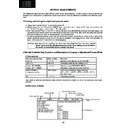
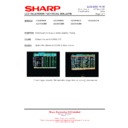
SERVICE ADJUSTMENTS
Caution: Use due care in handling the information described here lest the users should
know how to enter the adjustment process mode. If the settings tampered with in
this mode, unrecoverable system damage may result.
Paramenters
Adjustment process menu
header
Destination
Current color TV system
Currently selected input
Current page title
Current page/ Total pages
1/11 [INFO] TV AUTO FIX: AUTO
MAIN Version
Dev Version
Dev Loader Version
PIC Version
TEMP SENSOR
NORMAL StandBy Cause
ERROR StandBy Cause
LEW05 01.XXX (XXXX/XX/XX X) X
_ _ _ _ _
_ _ _ _ _
XX.XX
XXX
XXXXX
[1] 0 XXHXXM
[2] 0 XXHXXM
[3] 0 XXHXXM
[4] 0 XXHXXM
[5] 0 XXHXXM
19
LC-26GA5E
LC-32GA5E
LC-26P55E
LC-32P55E
LC-37P55E
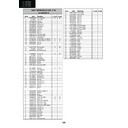
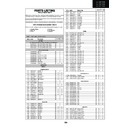
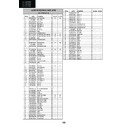
3. Adjustment process mode menu
The character string in brackets [ ] will appear as a page title in the adjustment process menu header.
Page Line Item
Description
Remarks (Adjustment detail, etc.)
[INFO]
1/11
1
2
3
4
5
6
7
Main Version
Dev Version
Dev Loader Version
PIC Version
TEMP SENSOR
NORMAL STANDBY CAUSE
ERROR STANDBY CAUSE
1.xxx (xx/xx/xxxx) x
- - - - -
- - - - -
xx.xx
xxx
[X]0
xxHxxM (X5)
Main microprocessor version (VCTP)
NOT USED
NOT USED
PIC version
Temp inside cabinet (near panel)
Last status which cause standby
Error standby cause
Total operating time before error
[INIT]
2/11
1
2
3
4
5
6
7
8
9
10
FACTORY INIT
PUBLIC MODE
Center Acutime
RESET
Backlight Acutime
RESET
Picture Read Pos X
Picture Read Pos Y
Picture Read Signal Type
Picture Read
(EURO/UK/ITALY/FRANCE/RUSSIA)ENTER
OFF/ON
xxh xxM
OFF/ON
xxH xxM
OFF/ON
0
0
PAL/COMP/HDMI/RGB
ON/OFF
Initialisation to factory settings
PUBLIC MODE flag setting
Main operating hours
Main operating hours reset
Backlight operating hours
Backlight operating hours reset
x-axis setting of picture data
y-axis setting of picture data
Signal type of picture data
Start/stop of picture data
[PAL. SECAM. N358]
3/11
1
2
3
4
5
6
7
8
9
RF-AGC ADJ
PAL+TUNER ADJ
PAL ADJ
TUNER ADJ
CONTRAST SD
SECAM CB OFFSET
SECAM CR OFFSET
TUNER A DAC
RF AGC
ENTER
ENTER
ENTER
ENTER
32
1
1
32
20
RF AGC auto adjustment
PALTUNER auto adjustment
PAL auto adjustment
TUNER auto adjustment
SD contrast adjustment
SECAM contrast adjustment
SECAM contrast adjustment
TUNER DAC adjustment
RF AGC adjustment
[COMP 15K]
4/11
1
2
COMP 15K ADJ
COMP 15K CONTRAST
ENTER
32
COMP 15K auto adjustment
Contrast adjustment
[HDTV]
5/11
1
HDTV CONTRAST
32
Contrast adjustment
[TUNER]
6/11
1
TUNER TEST
ENTER
Tuning test (tuning into 224.25 MHz) (Not
Operative)
[M GAMMA INFO]
7/11
1
2
3
4
5
6
7
8
M GAMMA IN 1
M GAMMA IN 2
M GAMMA IN 3
M GAMMA IN 4
M GAMMA IN 5
M GAMMA IN 6
M GAMMA IN WRITE
M GAMM IN RESET
160
320
480
640
800
960
OFF/ON
OFF/ON
W/B adjustment, gradation 1 input setting
W/B adjustment, gradation 2 input setting
W/B adjustment, gradation 3 input setting
W/B adjustment, gradation 4 input setting
W/B adjustment, gradation 5 input setting
W/B adjustment, gradation 6 input setting
EEP writing of adjustment values
Initialisation of adjustment values
[M GAMMA 1-3]
8/11
1
2
3
4
5
6
7
8
9
10
M GAMMA R 1
M GAMMA G 1
M GAMMA B 1
M GAMMA R 2
M GAMMA G 2
M GAMMA B 2
M GAMMA R 3
M GAMMA G 3
M GAMMA B 3
M GAMMA WRITE
0
0
0
0
0
0
0
0
0
OFF/ON
W/B adjustment, gradation 1R adjustment value
W/B adjustment, gradation 1G adjustment value
W/B adjustment, gradation 1B adjustment value
W/B adjustment, gradation 2R adjustment value
W/B adjustment, gradation 2G adjustment value
W/B adjustment, gradation 2B adjustment value
W/B adjustment, gradation 3R adjustment value
W/B adjustment, gradation 3G adjustment value
W/B adjustment, gradation 3B adjustment value
EEP writing of adjustment values
[M GAMMA 4-6]
9/11
1
2
3
4
5
6
7
8
9
10
M GAMMA R 4
M GAMMA G 4
M GAMMA B 4
M GAMMA R 5
M GAMMA G 5
M GAMMA B 5
M GAMMA R 6
M GAMMA G 6
M GAMMA B 6
M GAMMA WRITE
0
0
0
0
0
0
0
0
0
OFF/ON
W/B adjustment, gradation 4R adjustment value
W/B adjustment, gradation 4G adjustment value
W/B adjustment, gradation 4B adjustment value
W/B adjustment, gradation 5R adjustment value
W/B adjustment, gradation 5G adjustment value
W/B adjustment, gradation 5B adjustment value
W/B adjustment, gradation 6R adjustment value
W/B adjustment, gradation 6G adjustment value
W/B adjustment, gradation 6B adjustment value
EEP writing of adjustment values
20
LC-26GA5E
LC-32GA5E
LC-26P55E
LC-32P55E
LC-37P55E
4 Special Features
- ERROR STAND-BY CAUSE (Page 1/11)
When the unit enters standby due to operational error, total time before the error and the cause of error is recordered
on EEPROM, if possible. The values can be used to locate the fault for repair.
- EEP CLEAR (Page 10/11)
Restore NVM data to default values.
- EEP CLEAR B (Page 10/11)
Restore NVM data to default values except adjustment data.
5 Video Signal Adjustment Procedure
The adjustment process mode menu is listed in Section 3.
5.1. Signal check
Signal generator level adjustment check (Adjustment to the specifiedd level).
- Composite signal PAL
: 0.7Vp-p ± 0.02Vp-p (Pedestal to white level)
- 15K Component signal
: Y level
0.7Vp-p ± 0.02Vp-p (Pedestal to white level)
(50Hz) (576i/50Hz)
PB, PR level
0.7Vp-p ± 0.02Vp-p
Page Line Item
Description
Remarks (Adjustment detail, etc.)
[ETC]
10/11
1
2
3
4
5
6
7
8
9
EEP CLEAR
EEP CLEAR B
STAND BY CAUSE RESET
AUTO INSTALLATION SW
OPTION
COUNTRY
L ERR RESET
L ERR STOP
I2C-OFF
OFF/ON
OFF/ON
OFF/ON
0/1
0
AUTO
0
0/1
ENTER
Restore NVM data to default values
Restore NVM data to default values except
adjustment data
Clearing of standby cause error list
0: unfinished 1:finish (The setting takes effect
the next time the power is turned on.)
AUTO: defects the actual region.
Lamp error counter
Stops Lamp Error feature (Not operative)
BUS STOP
LCD
11/11
1
2
3
4
5
6
7
OSC FREQ 50
OSC FREQ 60
PWM FREQ 50
PWM FREQ 60
PWM FREQ
PWM DUTY
PWM CTRL
62
62
0
0
409
227
0
5.2. Entering the adjustment process mode
Enter the adjutment process mode according to Section
1.
5.3. RF AGC Adjustment
LC-26P50E
LC-32P50E
LC-37P50E
29
6. Special features
`
ERROR STANDBY CAUSE (Page 1/12)
When the unit enters standby due to operational error, total time before the error and the cause of error is
recorded on EEPROM, if possible.The values can be used to locate the fault for repair.
When the unit enters standby due to operational error, total time before the error and the cause of error is
recorded on EEPROM, if possible.The values can be used to locate the fault for repair.
`
EEP SAVE (Page 12/12)
Storage of EEP adjustment value.
Storage of EEP adjustment value.
`
EEP RESTORE (Page 12/12)
Retrieval of EEP adjustment value from storage area.
Retrieval of EEP adjustment value from storage area.
7. Video signal adjustment procedure
* The adjustment process mode menu is listed in Section 5.
(1) Signal check
Signal generator level adjustment check (Adjustment to the specified level)
» Composite signal
: 0.714Vp-p ± 0.02Vp-p (Pedestal to white level)
» Composite signal PAL
: 0.7Vp-p ±0.02Vp-p (Pedestal to white level)
» RGB signal
: 0.7Vp-p± 0.02Vp-p
» 15K component signal : Y level
0.7Vp-p±0.02Vp-p (Pedestal to white level)
(50 Hz)
PB, PR level
0.7Vp-p ±0.02Vp-p
» 33K component signal : Y level
0.7Vp-p ± 0.02Vp-p (Pedestal to white level)
PB, PR level
0.7Vp-p ±0.02Vp-p
(2) Entering the adjustment process mode
Enter the adjustment process mode according to Section 3.
(3) RF AGC adjustment
Adjustment point Adjustment conditions
Adjustment procedure
1
Setting
[Signal]
PAL
Field Color Bar
RF signal UV
[Terminal]
TUNER
PAL
Field Color Bar
RF signal UV
[Terminal]
TUNER
2
Auto adjustment Adjustment process page 3
performance
performance
»
Feed the PAL color bar signal (E-12ch) to TUNER.
Signal level: 52
Signal level: 52
±
1 dB µV (75� LOAD)
Bring the cursor on [ËRF AGC ADJ] and press [OK].
[ËRF AGC ADJ OK] appears when finished.
[ËRF AGC ADJ OK] appears when finished.
[E-12CH]
�100% white
21
LC-26GA5E
LC-32GA5E
LC-26P55E
LC-32P55E
LC-37P55E
5.4. PAL Signal & Tuner Adjustment
LC-26P50E
LC-32P50E
LC-37P50E
30
Adjustment point Adjustment conditions
Adjustment procedure
1
Setting
[Signal]
PAL
Full Field Color Bar
Composite or RF signal
[Terminal]
EXT3 VIDEO IN
TUNER
PAL
Full Field Color Bar
Composite or RF signal
[Terminal]
EXT3 VIDEO IN
TUNER
2
Auto adjustment Adjustment process page 3
performance
performance
» Feed the PAL full field color bar signal (75% color saturation) to EXT3
VIDEO IN.
» Feed the RF signal (PAL color bar) to TUNER.
» Make sure the PAL color bar pattern (E-12) has the sync level of 7:3 with
» Make sure the PAL color bar pattern (E-12) has the sync level of 7:3 with
the picture level.
Bring the cursor on [ËPAL + TUNER ADJ] and press [OK].
[ËPAL + TUNER ADJ OK]
appears when finished.
(4) PAL signal & tuner adjustment
[E-12CH]
�100% white
�100% white
[VIDEO IN SIGNAL]
(5) SECAM signal adjustment
(6) N358 signal adjustment
Adjustment point Adjustment conditions
Adjustment procedure
1
Adjustment
[Signal]
SECAM
Full Field Color Bar
[Terminal]
EXT3 VIDEO IN
SECAM
Full Field Color Bar
[Terminal]
EXT3 VIDEO IN
2
Auto adjustment Adjustment process page 3
performance
performance
» Feed the SECAM full field color bar signal (75% color saturation) to
EXT3 VIDEO IN.
Bring the cursor on [ËSECAM ADJ] and press [OK].
[ËSECAM ADJ OK] appears when finished.
[ËSECAM ADJ OK] appears when finished.
100% white ↑
Black
↑
Adjustment point Adjustment conditions
Adjustment procedure
1
Adjustment
[Signal]
N358
Full Field Color Bar
[Terminal]
EXT3 VIDEO IN
N358
Full Field Color Bar
[Terminal]
EXT3 VIDEO IN
2
Auto adjustment Adjustment process page 3
performance
performance
» Feed the N358 full field color bar signal (75% color saturation) to EXT3
VIDEO IN.
VIDEO IN.
Bring the cursor on [ËN358 ADJ] and press [OK].
[ËN358 ADJ OK] appears when finished.
[ËN358 ADJ OK] appears when finished.
↑100% white
75% color bar
↑
5.5. ADC Adjustment (Component 15K)
LC-26P50E
LC-32P50E
LC-37P50E
31
(7) ADC adjustment (Component 15K)
(8) ADC adjustment (Component 33K)
(9) HDMI signal adjustment
Adjustment point Adjustment conditions
Adjustment procedure
1
Adjustment
[Signal] (576i/50)
COMP15K, 50Hz
100%Full Field Color Bar
[Terminal]
EXT4 [COMPONENT]
COMP15K, 50Hz
100%Full Field Color Bar
[Terminal]
EXT4 [COMPONENT]
2
Auto adjustment Adjustment process page 4
performance
performance
» Feed the COMPONENT 15K 100% full field color bar signal (100% color
saturation) to EXT4 COMPONENT IN.
Bring the cursor on [ËCOMP15K ADJ] and press [OK].
[ËCOMP15K ADJ OK] appears when finished.
[ËCOMP15K ADJ OK] appears when finished.
Adjustment point Adjustment conditions
Adjustment procedure
1
Adjustment
[Signal]
COMP33K, 60Hz
100%Full Field Color Bar
[Terminal]
EXT3 COMPONENT IN
COMP33K, 60Hz
100%Full Field Color Bar
[Terminal]
EXT3 COMPONENT IN
2
Auto adjustment Adjustment process page 5
performance
performance
» Feed the COMPONENT 33K 100% full field color bar signal (100% color
saturation) to EXT3 COMPONENT IN.
Bring the cursor on [ËHDTV ADJ] and press [OK].
[ËHDTV ADJ OK] appears when finished.
[ËHDTV ADJ OK] appears when finished.
Adjustment point Adjustment conditions
Adjustment procedure
1
Adjustment
Recommended signal
generator:
Leader Electronics-
made LT448
generator:
Leader Electronics-
made LT448
2
Auto adjustment Adjustment process page 6
» Set the output signal to 1080i/59.94 (30sF) RGB digital one.
» Set the signal to full color bar (100% saturation) one. 8 bars with the
» Set the signal to full color bar (100% saturation) one. 8 bars with the
rightmost one in black. Dynamic range: min 16 to max. 235.
» Feed the signal to HDMI IN from the signal generator's DVI terminal
through the DVI-HDMI conversion cable.
Bring the cursor on [ËHDMI ADJ] and press [OK].
[ËHDMI ADJ OK] appears when finished.
[ËHDMI ADJ OK] appears when finished.
100% white ↑
Black
↑
100% white ↑
Black
↑
100% white ↑
Black
↑
6 White Balance Adjustment
Adjustment procedure Page 7/11 shows the value of adjustment gradation (IN value) and Adjustmnet procedure Page
8/11 & 9/11 show adj. offset value (initial value : 0). White balance adjustment is executed adjusting the adj. offset value,
indicated on Page 8/11 & 9/11.
Condition of the inspection: • Backlight: MAX (+8) [DYNAMIC]
• Colorimeter at screen centre
Adjustment reference device: Minolta CA-210
Adjustment spec. ±0.004, Inspection spec. : ±0.006 (GAMMA 1)
Adjustment spec. ±0.002, Inspection spec. : ±0.004 (GAMMA 2...6)
Adjustment: Check that the values on page 7/11 of process adjustment are set as below. If not, change them accor-
dingly.

