Read Sharp LC-30HV4E (serv.man7) Service Manual online
12
LC-30HV4E
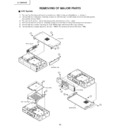
REMOVING OF MAJOR PARTS
1. Remove the five top panel retaining screws and slide the top panel backward to remove it.
2. Remove the four side panel retaining screws on both the right and left sides and slide the side panels
2. Remove the four side panel retaining screws on both the right and left sides and slide the side panels
backward to remove them.
3. Remove the three front panel retaining screws and remove the front panel.
4. Remove the five bottom panel retaining screws and slide the bottom panel backward to remove it.
5. Remove the four screws securing the main PWB angle and remove the angle upward.
6. Remove the four screws securing the main PWB to the angle and remove the main PWB.
4. Remove the five bottom panel retaining screws and slide the bottom panel backward to remove it.
5. Remove the four screws securing the main PWB angle and remove the angle upward.
6. Remove the four screws securing the main PWB to the angle and remove the main PWB.
Ë
Ë
Ë
Ë
Ë
AVC System
Top panel
Side panel, left
Side panel, right
2
2
1
1
1
3
3
4
4
4
Front panel
Bottom panel
Main PWB angle
6
5
Main PWB
13
LC-30HV4E
7. Remove the system/control terminal retaining:
7-1. Remove the four hex head screws securing the terminals of the system and control cables (white).
7-2. Remove the two screws securing the terminal of the system cable (gray).
7-3. Remove the rear chassis retaining screw.
7-2. Remove the two screws securing the terminal of the system cable (gray).
7-3. Remove the rear chassis retaining screw.
8. Remove the PC I/F and SR units:
8-1. Remove the four PC I/F unit shield retaining screws and remove the shield.
8-2. Remove the six PC I/F unit retaining screws and remove the I/F unit.
8-3. Remove the two PC I/F unit angle retaining screws and remove the angle.
8-4. Remove the two SR unit retaining screws and remove the SR unit.
8-2. Remove the six PC I/F unit retaining screws and remove the I/F unit.
8-3. Remove the two PC I/F unit angle retaining screws and remove the angle.
8-4. Remove the two SR unit retaining screws and remove the SR unit.
9. Remove the rear chassis:
9-1. Remove the two tuner nuts and washers.
9-1. Remove the 13 rear chassis retaining screws and remove the rear chassis.
9-1. Remove the 13 rear chassis retaining screws and remove the rear chassis.
10. Remove the three power supply board retaining screws and remove the power supply board.
8-1
8-2
8-3
8-4
7-1
7-3
7-2
PC I/F unit shield
PC I/F unit
PC I/F unit angle
SR unit
Rear chassis
9-2
9-1
10
Power unit
14
LC-30HV4E
11. Remove the AV unit:
11-1. Remove the five AV unit retaining screws and remove the AV unit.
11-2. Remove the three AV unit angle retaining screws and remove the angle.
11-2. Remove the three AV unit angle retaining screws and remove the angle.
12. Remove the fan:
12-1. Remove the two cooling fan retaining screws and remove the cooling fan.
13. Remove unit from the front chassis:
13-1. Remove the two hex head screws and two screws securing the front shield to the front chassis and
remove the front shield.
13-2. Remove the four screws securing the front unit and remove the unit.
11-1
11-2
AV unit
AV unit angle
Cooling Fan
12-1
13-2
Front unit
Front shield
13-1
15
LC-30HV4E
Ë
Ë
Ë
Ë
Ë
Display
1. Take off bottom terminal cover.
2. Take off the speaker by removing 4 screws and disconnecting speaker terminals.
3. Take off the table stand by removing 6 screws.
4. Take off the rear cabinet by removing 18 screws and releasing the front cabinet's 6 hooks.
5. Take off the operation cover assembly by removing 2 screws and detaching the connector.
6. Take off the center angle by removing 8 screws and disconnecting 1 lead wire from the fan.
1
Rear Cabinet
Speaker
Speaker
Table Stand
Terminal Cover
4
4
4
2
3
2
2
4
4
4
4
4
2
4
4
6
5
6
5
5
6
P131
P130
Operation Cover Ass'y
Center Angle
P2103

