Read Sharp PG-B10S (serv.man33) User Guide / Operation Manual online
-18
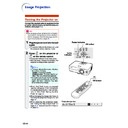
Image Projection
Turning the Projector on
Connect the required external equipment to the
projector before carrying out the following pro-
cedures. (See page
projector before carrying out the following pro-
cedures. (See page
50
.)
Info
•
The language preset at the factory is English.
If you want to change the on-screen display to
another language, reset the language accord-
ing to the procedure on page
If you want to change the on-screen display to
another language, reset the language accord-
ing to the procedure on page
48
.
1
Plug the power cord into the wall
outlet.
outlet.
•
The power indicator illuminates red, and
the projector enters standby mode.
the projector enters standby mode.
2
Press
on the projector or
on the remote control.
•
The power indicator illuminates green.
•
After the lamp indicator illuminates, the
projector is ready to start operation.
projector is ready to start operation.
Note
•
The lamp indicator illuminates, indicating
the status of the lamp.
the status of the lamp.
Green: The lamp is ready.
Blinking in green: The lamp is warming up.
Red: The lamp should be replaced.
Blinking in green: The lamp is warming up.
Red: The lamp should be replaced.
•
If the projector is put into the standby
mode and immediately turned on
again, the lamp indicator may take
some time to illuminate.
mode and immediately turned on
again, the lamp indicator may take
some time to illuminate.
•
When “Anti-Theft” is set, the keycode
input box will appear. Enter the keycode.
For details about the Anti-Theft function,
refer to “Anti-Theft (Setting the Anti-
Theft)” on page
input box will appear. Enter the keycode.
For details about the Anti-Theft function,
refer to “Anti-Theft (Setting the Anti-
Theft)” on page
46
.
•
When bringing the image into focus or
adjusting the projection image size, see
page
adjusting the projection image size, see
page
22
.
•
When adjusting the projection angle,
see “Using the Adjustment Feet” on
page
see “Using the Adjustment Feet” on
page
23
or “Variable Lens Shift Feature”
on page
24
.
▼Keycode input box
Power indicator
ON button
Lamp
indicator
ON button
-19
Projection
Switching the INPUT
Mode
Mode
Select the appropriate input mode for the con-
nected equipment.
nected equipment.
Press
,
or
on the remote
control to select the INPUT mode.
•••••
When pressing
on the projector, input
mode switches in order of
INPUT 1
INPUT 2
INPUT 3
.
Note
•
When no signal is received, “NO SIGNAL”
will be displayed. When a signal that the
projector is not preset to receive is received,
“NOT REG.” will be displayed.
will be displayed. When a signal that the
projector is not preset to receive is received,
“NOT REG.” will be displayed.
•
The INPUT mode is not displayed when
“OSD Display” of the “Options” menu is set
to “OFF”. (See page
“OSD Display” of the “Options” menu is set
to “OFF”. (See page
41
.)
About the INPUT mode
Adjusting the Volume
Press
or
on the remote con-
trol to adjust the volume.
Note
•
Pressing
will lower the volume.
Pressing
will raise the volume.
•
On the projector, the volume can be ad-
justed by pressing
or
.
"On-screen Display of INPUT Mode (Example)
Using RGB
Using
Component
Component
INPUT 1 mode
INPUT 3 mode
Using Video
Using Video
INPUT 2 mode
Using S-Video
Using S-Video
➝
➝
➝
Used for projecting images from
equipment that sends RGB sig-
nals or component signals con-
nected to the RGB input terminal.
equipment that sends RGB sig-
nals or component signals con-
nected to the RGB input terminal.
Used for projecting images
from equipment connected to
the S-VIDEO input terminal.
from equipment connected to
the S-VIDEO input terminal.
Used for projecting images
from equipment connected to
the VIDEO input terminal.
from equipment connected to
the VIDEO input terminal.
INPUT 1
(RGB/
Component)
(RGB/
Component)
INPUT 2
(S-Video)
(S-Video)
INPUT 3
(Video)
(Video)
INPUT buttons
Volume buttons
-20
Image Projection
Displaying the Black
Screen and Turning off
the Sound Temporarily
Screen and Turning off
the Sound Temporarily
Press
on the remote control to
temporarily display a black screen
and turn off the sound.
and turn off the sound.
Note
•
Pressing
again will turn the projected
image and sound back on.
Correcting Trapezoidal
Distortion
Distortion
When the image is projected either from the top
or from the bottom towards the screen at an
angle, the image becomes distorted trapezoidally.
The function for correcting trapezoidal distortion
is called
or from the bottom towards the screen at an
angle, the image becomes distorted trapezoidally.
The function for correcting trapezoidal distortion
is called
Keystone Correction
.
Note
•
The Keystone Correction can be adjusted
up to an angle of approximately ±35 degrees
and the screen can also be set up to an
angle of approximately ±35 degrees (when
the resize mode is set to “NORMAL” (see
page
up to an angle of approximately ±35 degrees
and the screen can also be set up to an
angle of approximately ±35 degrees (when
the resize mode is set to “NORMAL” (see
page
26
)).
•
The Keystone Correction cannot be ad-
justed in the lateral direction.
justed in the lateral direction.
1
Press
to enter the Key-
stone Correction mode.
•
You can also use
on the projector.
AV MUTE button
"On-screen display (Keystone Correction mode)
'
,
"
,
\
,
|
buttons
KEYSTONE
button
button
UNDO
button
button
-21
Projection
2
Press ', ", \ and | to adjust
the Keystone Correction.
•
You can also adjust the Keystone Cor-
rection using the
,
,
and
buttons on the projector.
Note
•
Press
to return to the default setting.
•
Straight lines or the edges of images may
appear jagged while adjusting the image.
appear jagged while adjusting the image.
3
Press
.
•
The on-screen display of the Keystone
Correction mode will disappear.
Correction mode will disappear.
•
You can also use
on the projector.
Note
•
You can use the same settings used in
NORMAL mode 4:3 for 16:9.
NORMAL mode 4:3 for 16:9.
Turning the Power off
(Putting
the Projector into the Standby Mode)
1
Press
on the projector or
STANDBY
on the remote control, then
press that button again while the
confirmation message is dis-
played, to put the projector into
the standby mode.
confirmation message is dis-
played, to put the projector into
the standby mode.
Note
•
If you accidentally pressed
or
STANDBY
and do not want to put the pro-
jector into the standby mode, wait until
the confirmation message disappears.
the confirmation message disappears.
2
Unplug the power cord from the AC
outlet after the cooling fan stops.
outlet after the cooling fan stops.
Info
•
Do not unplug the power cord during pro-
jection or cooling fan operation. The cool-
ing fan in this projector continues to run
for about 90 seconds after the projector
enters the standby mode. This can cause
damage due to rise in internal tempera-
ture, as the cooling fan also stops.
jection or cooling fan operation. The cool-
ing fan in this projector continues to run
for about 90 seconds after the projector
enters the standby mode. This can cause
damage due to rise in internal tempera-
ture, as the cooling fan also stops.
Compresses
lower side.
lower side.
Compresses
upper side.
upper side.
STANDBY
button
button

