Read Sharp MX-EB11 / MX-EB12 Service Manual online
MX-7040N MX-EB11 (ENHANCED COMPRESSION KIT) 28 – 1
MX-7040N
Service Manual
[28] MX-EB11 (ENHANCED COMPRESSION KIT)
1. Unpacking
A. Packed items check
2. Installation
NOTE: Before installation, be sure to turn both the operation and
main power switches off and disconnect the power plug
from the power outlet. Make double sure that the data lamp
on the operation panel does not light up or blink when per-
forming installation.
from the power outlet. Make double sure that the data lamp
on the operation panel does not light up or blink when per-
forming installation.
NOTE: The "E7-48" error is occurred if install the older version of
MX-EB11 than the "03.00.A1."
Check the version of the ACU (MAIN) and the ACU (DATA)
in SIM22-5, update the firmware if version is not "03.00.A1"
or newer.
Check the version of the ACU (MAIN) and the ACU (DATA)
in SIM22-5, update the firmware if version is not "03.00.A1"
or newer.
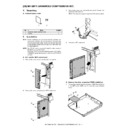
A. Pull out the MFP control unit
1)
Remove the screw, and remove the right rear cabinet.
2)
Remove the screw, and pull out the MFP control unit.
3)
Remove the screw, and remove the snap band. Connect the
connector of the FAX unit.
MEMO: The step 3) is required only when FAX unit is installed.
connector of the FAX unit.
MEMO: The step 3) is required only when FAX unit is installed.
4)
Pull out the MFP control unit.
B. Scanner function expansion PWB installation
1)
Connect the scanner function expansion PWB (Packed items)
to the MFP control PWB, and fit it with the screw (Packed
items).
to the MFP control PWB, and fit it with the screw (Packed
items).
No.
Name
Quantity
1
Scanner function expansion PWB
1
2
Screw
2
1
2
1
2
1
1
2
3
2
1
1
1
2
MX-7040N MX-EB11 (ENHANCED COMPRESSION KIT) 28 – 2
C. Attach the MFP control unit
1)
Insert the MFP control unit into the main unit.
2)
Connect the interface cable to the MFP control PWB.
3)
Push the interface cable into the recessed portion of the sheet
metal on the MFP control unit.
metal on the MFP control unit.
4)
Fix a snap band with the screw.
MEMO: The step 2), 3) and 4) are required only when FAX unit
is installed.
MEMO: The step 2), 3) and 4) are required only when FAX unit
is installed.
5)
Attach the MFP control unit into the main unit, and fix the
screw.
screw.
6)
Attach the right rear cabinet, and fix the screw.
MEMO: Pass the I/F cable through an opening in the right rear
cabinet if FAX unit is installed.
MEMO: Pass the I/F cable through an opening in the right rear
cabinet if FAX unit is installed.
D. Turn ON the power of the main unit
1)
Connect the power plug of the machine to the power outlet,
and turn ON the main power switch and the operation panel
power switch.
and turn ON the main power switch and the operation panel
power switch.
E. Confirmation of connection
1)
Execute SIM22-10 to check to confirm that the combined
machine recognizes the MX-EB11.
machine recognizes the MX-EB11.
1
2
3
2
2
1
2
1
Display

