Read Sharp AR-P16 (serv.man12) FAQ online
AR-C260 FLASH UPGRADE PROCEDURE
AR-P16 Print Controller
Note: A Printer and NIC configuration page should be printed, prior to upgrading the firmware.
Note: A Printer and NIC configuration page should be printed, prior to upgrading the firmware.
1.
Check that the AR-P16 Parallel Printer Port is enabled within the “Custom
Settings” menu. (Key Operator – Printer Settings – Interface Settings)
Settings” menu. (Key Operator – Printer Settings – Interface Settings)
2.
Power off the copier and remove the AR-P16 printer control board.
3.
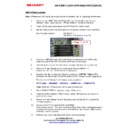
Set the “Write protect” control jumpers as follows and reinstall the control Pwb:-
Boot Program upgrade
Set JP1 to H
Set JP3 to H (Default setting is H)
2.
Connect an IEE1284 centronics cable from the parallel port of the PC to the
centronics port of the Print Controller and Power on the copier.
4.
Start Windows and boot to a “Command Prompt” (Windows 98 is preferred).
5.
When the Printer “Ready Lamp” is displayed, Execute SIM 67-14.
(Check that “PLEASE SEND DATA“ is displayed.)
(Check that “PLEASE SEND DATA“ is displayed.)
6.
Download the file by typing the following command:- COPY/B ***.BLK LPT1:
(Download the Boot program first if both Boot & PCL firmware require upgrading).
The machine will display the following display sequence:-
RECEIVING → ERASING → WRITING → VERIFYING → COMPLETED
Note: Never turn off the power during program download.
7.
When “COMPLETED” is displayed, power off the copier.
8.
Return the Print Controller “Write Protect” Jumper JP1 back to L position and
power on the copier.
power on the copier.
9.
When the Printer “Ready” lamp is displayed, execute Sim 22-05 to confirm the
firmware version(s).
firmware version(s).
10.
Execute Sim 67-17 to clear the Printer NVRAM.
(Also execute Sim 67-18 to clear the Printer Flash Data before configuring network
scanning and entering destinations for the first time only otherwise, ALL existing
destinations will be erased).
(Also execute Sim 67-18 to clear the Printer Flash Data before configuring network
scanning and entering destinations for the first time only otherwise, ALL existing
destinations will be erased).
11.
Perform User colour calibration from within “Custom Settings.
ALL FIRMWARE CAN
BE FOUND ON THE SHARP TECHNICAL WEBSITE.
http://www.tradenet.sharp.co.uk/tech/
Change “L” to “H”
Display

