Read Sharp AL-1566 (serv.man8) Service Manual online
AL-1556/1566 UNPACKING AND INSTALLATION 5 - 1
[5] UNPACKING AND INSTALLATION
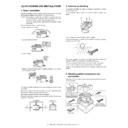
1. Copier installation
Improper installation may damage the copier. Please note the following
during initial installation and whenever the copier is moved.
during initial installation and whenever the copier is moved.
Caution: If the copier is moved from a cool place to a warm place, con-
densation may form inside the copier. Operation in this condi-
tion will cause poor copy quality and malfunctions.
Leave the copier at room temperature for at least 2 hours
before use.
tion will cause poor copy quality and malfunctions.
Leave the copier at room temperature for at least 2 hours
before use.
Do not install your copier in areas that are:
• damp, humid, or very dusty
• exposed to direct sunlight
• poorly ventilated
• subject to extreme temperature or humidity changes, e.g., near an
air conditioner or heater.
The copier should be installed near an accessible power outlet for easy
connection.
connection.
Be sure to connect the power cord only to a power outlet that meets
the specified voltage and current requirements.
the specified voltage and current requirements.
Also make certain the outlet is properly grounded.
Be sure to allow the required space around the machine for servicing
and proper ventilation.
and proper ventilation.
2. Cautions on handling
Be careful in handling the copier as follows to maintain the perfor-
mance of this copier.
mance of this copier.
Do not drop the copier, subject it to shock or strike it against any
object.
object.
Do not expose the drum cartridge to direct sunlight.
Doing so will damage the surface (green portion) of the drum cartridge,
causing poor print quality.
causing poor print quality.
Store spare supplies such as drum cartridges and TD cartridges in a
dark place without removing from the package before use.
dark place without removing from the package before use.
If they are exposed to direct sunlight, poor print quality may result.
Do not touch the surface (green portion) of the drum cartridge.
Doing so will damage the surface of the cartridge, causing poor print
quality.
quality.
3. Checking packed components and
accessories
Open the carton and check if the following components and accesso-
ries are included.
ries are included.
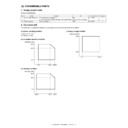
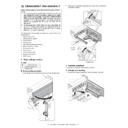
8"(20cm)
8" (20cm)
4"
(10cm)
4"
(10cm)
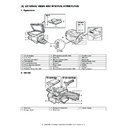
Drum cartridge
(installed in machine)
Software CD-ROM
Telephone line cord
(AL-1566)
(AL-1566)
• Operation manual
• Operation manual
• Operation manual
(For Facsimile)
(AL-1566)
(AL-1566)
TD cartridge
AC cord
AL-1556/1566 UNPACKING AND INSTALLATION 5 - 2
4. Unpacking
Be sure to hold the handles on both sides of the machine to unpack the
machine and carry it to the installation location.
machine and carry it to the installation location.
5. Removing protective packing materials
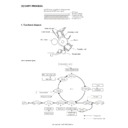
1) Remove all pieces of tape shown in the illustration below and then
open the RSPF and remove the protective materials. Take out the
bag containing the TD cartridge.
bag containing the TD cartridge.
2) Release the scan head locking switch.
6. Installing the TD cartridge
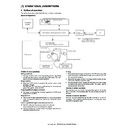
1) Open the bypass tray, and then open the side cover.
2) Remove the CAUTION tape from the front cover and remove the
two protective pins from the fusing machine by pulling the strings
upward one at a time.
upward one at a time.
3) Press gently on both sides of the front cover to open the cover.
4) Remove the TD cartridge from the bag. Remove the protective
paper. Hold the cartridge on both sides and shake it horizontally
four or five times. Hold the tab of the protective cover and pull the
tab to your side to remove the cover.
four or five times. Hold the tab of the protective cover and pull the
tab to your side to remove the cover.
5) While pushing the lock release button, gently insert the TD car-
tridge until it locks into place.
6) Close the front cover and then the side cover by pressing the round
projections near the side cover open button.
Note: When closing the covers, be sure to close the front cover
securely and then close the side cover. If the covers are closed
in the wrong order, the covers may be damaged.
in the wrong order, the covers may be damaged.
7) Ensure that the power switch of the machine is in the OFF position.
Plug the other end of the power cord into the nearest outlet.
Lock
Unlock
Grasp here and turn in
the direction of the arrow.
the direction of the arrow.
CAUTION tape
Protective pins
4 or 5 times
Lock release button
AL-1556/1566 UNPACKING AND INSTALLATION 5 - 3
7. Loading the paper tray
Note: Make sure that the paper is not torn, is free of dust, and has no
wrinkles or curled edges.
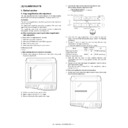
1) Raise the handle of the paper tray and pull the paper tray out until it
stops.
2) Remove the pressure plate lock. Rotate the pressure plate lock in
the direction of the arrow to remove it while pressing down on the
pressure plate of the paper tray.
pressure plate of the paper tray.
3) Store the pressure plate lock which has been removed in step 2. To
store the pressure plate lock, rotate the lock to secure it as shown
below.
below.
4) Squeeze the lock lever of the front guide and slide the front guide to
match the width of the paper, and move the left guide to the appro-
priate slot as marked on the tray.
priate slot as marked on the tray.
• The front guide is a slide-type guide. Grasp the locking knob on
the guide and slide the guide to the indicator line of the paper to
be loaded.
be loaded.
• The left guide is an insert-type guide. Remove it and then insert it
at the indicator line of the paper to be loaded.
5) Fan the paper and insert it into the tray. Make sure that the edges
go under the corner hooks.
Note:
• Do not load paper above the maximum height line (
).
Exceeding the line will cause a paper misfeed.
• If the paper is not fanned, double-feeds or misfeeds may occur.
• Make sure the stack of paper is straight before loading it. When add-
ing paper, take the remaining paper out and combine it into a single
stack with the new paper.
stack with the new paper.
• Make sure that all the paper in the stack is the same size and type.
• When loading paper, ensure that there is no space between the
paper and the guide, and make sure that the guide is not set too nar-
row and causes the paper to bend. Incorrect loading will cause the
paper to skew or misfeed.
row and causes the paper to bend. Incorrect loading will cause the
paper to skew or misfeed.
6) Gently push the paper tray back into the machine.
Note:
• If you loaded a different size of paper than was loaded previously in
the tray.
• When not using the machine for an extended period, remove all
paper from the paper tray and store it in a dry place. If paper is left in
the machine for an extended period, the paper will absorb moisture
from the air, resulting in paper jams.
the machine for an extended period, the paper will absorb moisture
from the air, resulting in paper jams.
8. Power to copier
1) Ensure that the power switch of the copier is in the OFF position.
Insert the attached power cord into the power cord socket at the
rear of the copier.
rear of the copier.
2) Plug the other end of the power cord into the nearest outlet.
9. Software for AL-1556/1566
The CD-ROM that accompanies the machine contains the following
software:
software:
MFP driver
Printer driver
The printer driver enables you to use the printer function of the
machine.
machine.
The printer driver includes the Print Status Window. This is a utility that
monitors the machine and informs you of the printing status, the name
of the document currently being printed, and error messages.
monitors the machine and informs you of the printing status, the name
of the document currently being printed, and error messages.
Please note that the Print Status Window does not operate when the
machine is used as a network printer.
machine is used as a network printer.
Scanner driver (USB only)
The scanner driver allows you to use the scanning function of the
machine with TWAIN-compliant and WIA-compliant applications.
machine with TWAIN-compliant and WIA-compliant applications.
Sharpdesk (USB only)
Sharpdesk is an integrated software environment that makes it easy to
manage documents and image files, and launch applications.
manage documents and image files, and launch applications.
Button Manager (USB only)
Button Manager allows you to use the scanner menus on the machine
to scan a document.
to scan a document.
Note: The scanning feature can only be used with computers that are
running Windows 98/Me/2000/XP and are connected to the
machine by a USB cable. If you are running Windows 95/NT 4.0
or are connected to the machine by a LAN connection, only the
printer function can be used.
machine by a USB cable. If you are running Windows 95/NT 4.0
or are connected to the machine by a LAN connection, only the
printer function can be used.
Pressure plate lock
Left
guide
guide
Front
guide
guide
AL-1556/1566 UNPACKING AND INSTALLATION 5 - 4
A. Before installation
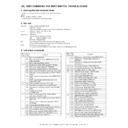
(1) Hardware and software requirements
Check the following hardware and software requirements in order to
install the software.
install the software.
*
1
The machine's USB port will transfer data at the speed specified by
the USB 2.0 (Hi-Speed) only if the Microsoft USB 2.0 driver is prein-
stalled in the computer, or if the USB 2.0 driver for Windows 2000
Professional/XP that Microsoft provides through its "Windows
Update" is installed.
the USB 2.0 (Hi-Speed) only if the Microsoft USB 2.0 driver is prein-
stalled in the computer, or if the USB 2.0 driver for Windows 2000
Professional/XP that Microsoft provides through its "Windows
Update" is installed.
*
2
Compatible with Windows 98, Windows Me, Windows 2000 Profes-
sional, Windows XP Professional or Windows XP Home Edition
preinstalled model standardly equipped with a USB port.
sional, Windows XP Professional or Windows XP Home Edition
preinstalled model standardly equipped with a USB port.
*
3
Printing is not available in MS-DOS mode.
*
4
The machine does not support printing from a Macintosh environ-
ment.
ment.
*
5
Administrator's rights are required to install the software using the
installer.
installer.
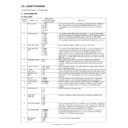
(2) Installation environment and usable software
The following table shows the drivers and software that can be
installed for each version of Windows and port connection method.
installed for each version of Windows and port connection method.
*1 Windows 98/Me does not support USB 2.0. A USB 2.0 connection
can be used in Windows 98/Me, however, the performance will be
the same as USB 1.1. The print speed based on USB 2.0 specifica-
tions can only be attained if your computer is running Windows
2000/XP, you are using a cable that supports USB 2.0 (USB 1.1 or
USB 2.0 certified), and the cable is connected to a USB 2.0 port on
your computer. If the connection is made through a hub, the hub
must support USB 2.0.
*
2
The printer driver that is installed will vary depending on the type of
connection between the machine and your computer.
connection between the machine and your computer.
B. Installing the software
Note:
• If you need to use a different connection method after installing the
software using a USB or network connection, you must first uninstall
the software and then install it using the new connection method.
the software and then install it using the new connection method.
• In the following explanations it is assumed that the mouse is config-
ured for right hand operation.
• The scanner feature only works when using a USB cable.
• If an error message appears, follow the instructions on the screen to
solve the problem. After the problem is solved, the installation proce-
dure will continue. Depending on the problem, you may have to click
the "Cancel" button to exit the installer. In this case, reinstall the soft-
ware from the beginning after solving the problem.
dure will continue. Depending on the problem, you may have to click
the "Cancel" button to exit the installer. In this case, reinstall the soft-
ware from the beginning after solving the problem.
• When installing Sharpdesk, a minimal version of Internet Explorer
5.01 will be installed on your computer if your computer does not
currently have Internet Explorer version 4.01 or later.
currently have Internet Explorer version 4.01 or later.
(1) Using the machine with a USB connection
1) The USB cable must not be connected to the machine. Make sure
that the cable is not connected before proceeding.
If the cable is connected, a Plug and Play window will appear. If this
happens, click the "Cancel" button to close the window and discon-
nect the cable.
happens, click the "Cancel" button to close the window and discon-
nect the cable.
Note: The cable will be connected in step 15.
2) Insert the CD-ROM into your computer's CD-ROM drive.
3) Click the "start" button, click "My Computer", and then double-click
the CD-ROM icon.
In Windows 98/Me/2000, double-click "My Computer", and then
double-click the CD-ROM icon.
double-click the CD-ROM icon.
4) Double-click the "setup" icon.
Note: If the language selection screen appears after you double click
the "setup" icon, select the language that you wish to use and
click the "Next" button. (Normally the correct language is
selected automatically.)
click the "Next" button. (Normally the correct language is
selected automatically.)
5) The "SOFTWARE LICENCE" window will appear. Make sure that
you understand the contents of the software licence, and then click
the "Yes" button.
the "Yes" button.
6) Read the "Readme First" in the "Welcome" window and then click
the "Next" button.
7) To install all of the software, click the "Standard" button.
To install particular packages, click the "Custom" button.
If you selected "Custom", go to step 9.
8) Read the message in the "Welcome" window and then click the
"Next" button.
If you selected "Standard" in step 7, installation will begin.
Go to step 14.
9) If you clicked the "Custom" button, select the checkboxes of the
software packages to be installed and then click the "Next" button.
Click the "Display README" button to show information on pack-
ages that are selected.
ages that are selected.
Computer type IBM PC/AT or compatible computer equipped with a
USB2.0*
1
/1.1*
2
or 10Base-T LAN port
Operating
system*
system*
3
*
4
Windows 95, Windows 98, Windows Me, Windows
NT Workstation 4.0 (ServicePack 5 or later)*
NT Workstation 4.0 (ServicePack 5 or later)*
5
,
Windows 2000 Professional*
5
, Windows XP
Professional*
5
, Windows XP Home Edition*
5
Display
800 x 600 dots (SVGA) display with 256 colors (or
better)
better)
Hard disk free
space
space
150MB or more
Other hardware
requirements
requirements
An environment on which any of the operating
systems listed above can fully operate
systems listed above can fully operate
Cable
Operating system
MFP Driver
Button
Manager
Sharpdesk
Printer
driver
Scanner
driver
USB
*
*
1
Windows 98/Me/
2000/XP
2000/XP
Available
*
*
2
Available
LAN
Windows 95/98/Me/
NT 4.0/2000/XP
NT 4.0/2000/XP
Not Available

