Read Sharp AL-1566 (serv.man12) Service Manual online
AL-1556/1566 ADJUSTMENTS 9 - 1
[9] ADJUSTMENTS
1. Optical section
A. Copy magnification ratio adjustment
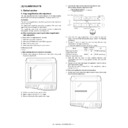
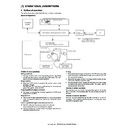
The copy magnification ratio must be adjusted in the main scanning
direction and in the sub scanning direction. To adjust, use TC 48-01.
direction and in the sub scanning direction. To adjust, use TC 48-01.
(1) Outline
The main scanning (front/rear) direction magnification ratio adjustment
is made manually.
is made manually.
The adjustment is made by manual key operations. (The zoom data
register set value is changed for adjustment.)
register set value is changed for adjustment.)
The magnification ratio in the sub scanning direction is adjusted by
changing the carriage (scanner) scanning speed.
changing the carriage (scanner) scanning speed.
(2) Main scanning/sub scanning direction magnification
ratio adjustment
a. Cases when the adjustment is required
1) When the main PWB is replaced.
2) When the EEPROM in the main PWB is replaced.
3) When "U2" trouble occurs.
4) When repairing or replacing the optical section.
b. Necessary tools
• Scale
c. Main scanning direction adjustment procedure
for precise adjustment.)
2) Set the copy magnification ratio to 100%.
3) Make a copy on A4 or 81/2" x 11" paper.
4) Measure the length of the copied scale image.
5) Calculate the main scanning direction magnification ratio.
Main scanning direction magnification ratio
6) Check that the copy magnification ratio is within the specified
range. If it is not within the specified range, perform the following
procedures.
procedures.
7) Execute TC 48-01 to select the main scanning direction copy
magnification ratio adjustment mode.
To select the adjustment mode, use the [
To select the adjustment mode, use the [
←
/
→
] key.
8) Enter the new set value of main scanning direction copy
magnification ratio with the copy quantity set key, and press the
[START] key.
[START] key.
9) Change the set value and repeat the adjustment until the ratio is
within the specified range.
When the set value is changed by 1, the magnification ratio is
changed by 0.1%.
When the set value is changed by 1, the magnification ratio is
changed by 0.1%.
d. Sub scanning direction adjustment procedure
scale for precise adjustment.)
=
Copy image dimensions
X 100 (%)
Original dimension
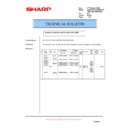
Mode
Display
item
Default
value
LED
Main scan direction
magnification ratio
magnification ratio
F-R
50
PRINT mode lamp
OC mode sub scan
direction magnification ratio
direction magnification ratio
SCAN
50
SCAN mode lamp
100
110
120
130
150
140
mm
1/2mm
JAPAN
HARDENED
STAINLESS
Shizuoka
100
110
120
130
150
140
mm
1/2mm
JAPAN
HARDENED
STAINLESS
Shizuoka
110
10
20
10
20
(When a 100mm scale is used as the original.)
Paper feed
direction
Reference
Comparison point
Original (Scale)
Copy
AL-1556/1566 ADJUSTMENTS 9 - 2
2) Set the copy magnification ratio to 100%.
3) Make a copy on A4 or 81/2" x 11" paper.
4) Measure the length of the copied scale image.
5) Calculate the sub scanning direction copy magnification ratio
using the formula below.
6) Check that the actual copy magnification ratio is within the
specified range. (100 ± 1.0%).
If it is not within the specified range, perform the following
procedures.
If it is not within the specified range, perform the following
procedures.
7) Execute TC 48-01 to select the sub scanning direction copy
magnification ratio adjustment mode.
To select the adjustment mode, use the [
To select the adjustment mode, use the [
←
/
→
] key. (SCAN mode
lamp ON)
8) Enter the new set value of sub scanning direction copy
magnification ratio with the copy quantity set key, and press the
[START] key.
[START] key.
Repeat procedures 1) - 8) until the sub scanning direction actual copy
magnification ratio in 100% copying is within the specified range.
magnification ratio in 100% copying is within the specified range.
When the set value is changed by 1, the magnification ration is
changed by 0.1%.
changed by 0.1%.
B. Image position adjustment
The employed test commands and the contents are as follows:
The modes can be selected by pressing [
←
/
→
] key.
(*): Support for the installation models. For non-installation models,
skip.
* In the 2nd print center offset adjustment, print is made forcibly as
1to2/Long Edge from OC regardless of duplex setting.
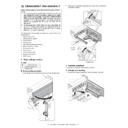
(1) Lead edge adjustment
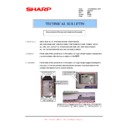
1) Set a scale to the center of the paper lead edge guide as shown
below, and cover it with B4 or 8 1/2" x 14" paper.
2) Execute TC 50 - 01
3) Set the print start position (A: COPY mode lamp ON), the lead
edge void amount (B: PRINT mode lamp ON), the scan start posi-
tion (C: SCAN mode lamp) to 1, and make a copy of the scale at
100%.
tion (C: SCAN mode lamp) to 1, and make a copy of the scale at
100%.
4) Measure the image loss (Rmm) of the scale.
Set C = 10 x R (mm). (Example: Set to 40.)
When the value of C is increased by 10, the image loss is
decreased by 1mm. (Default: 50)
decreased by 1mm. (Default: 50)
5) Measure the distance (Hmm) from the paper lead edge to the
image print start position.
Set A = 10 x H (mm). (Example: Set to 50.)
When the value of A is increased by 10, the image lead edge is
moved to the paper lead edge by 1mm. (Default: 50).
moved to the paper lead edge by 1mm. (Default: 50).
6) Set the lead edge void amount to B = 50 (2.5mm). (Default: 50)
When the value of B is increased by 10, the void is extended by
about 0.1mm. (For 25 or less, however, the void amount is
regarded as 0.)
about 0.1mm. (For 25 or less, however, the void amount is
regarded as 0.)
* The SFP adjustment is made by adjusting the SPF image scan start
position after OC adjustment.
=
Copy image dimensions
X 100 (%)
Original dimension
Mode
Display
item
Default
LED
TC
Print start position
(Main cassette paper
feed)
(Main cassette paper
feed)
TRAY1
50
COPY mode lamp
Main cassette
lamp
Main cassette
lamp
50-01
(*) Print start position
(2nd cassette paper
feed)
(2nd cassette paper
feed)
TRAY2
50
COPY mode lamp
2nd cassette lamp
2nd cassette lamp
Print start position
(Manual paper feed)
(Manual paper feed)
MFT
50
COPY mode lamp
Manual feed lamp
Manual feed lamp
Image lead edge void
amount
amount
DEN-A
50
PRINT mode lamp
Image scan start
position
position
RRC-A
50
SCAN mode lamp
Image rear edge void
amount
amount
DEN-B
50
COPY mode lamp
PRINT mode lamp
SCAN mode lamp
PRINT mode lamp
SCAN mode lamp
100
110
120
130
150
140
mm
1/2mm
JAPAN
HARDDENCD
STAINLESS
Shizuoka
100
110
120
130
150
140
mm
1/2mm
JAPAN
HARDDENCD
STAINLESS
Shizuoka
110
10
20
10
20
Original (Scale)
Paper feed
direction
Reference
Comparison point
Copy
Mode
Display
item
Default
LED
TC
Print center offset
(Main cassette paper
feed)
(Main cassette paper
feed)
TRAY1
50
COPY mode lamp
Main cassette lamp
Main cassette lamp
50-10
(*) Print center offset
(2nd cassette paper
feed)
(2nd cassette paper
feed)
TRAY2
50
COPY mode lamp
2nd cassette lamp
2nd cassette lamp
Print center offset
(Manual paper feed)
(Manual paper feed)
MFT
50
COPY mode lamp
Manual feed lamp
Manual feed lamp
2nd print center
offset (Main cassette
paper feed)
offset (Main cassette
paper feed)
SIDE2
50
PRINT mode lamp
Main cassette lamp
Main cassette lamp
AL-1556/1566 ADJUSTMENTS 9 - 3
(Example)
(2) Image rear edge void amount adjustment
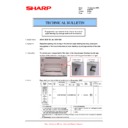
1) Set a scale to the rear edge section of A4 or 11" x 8 1/2" paper size
as shown in the figure below, and cover it with B4 or 8 1/2" x 14"
paper.
paper.
2) Execute TC 50 - 01 to select the image rear edge void amount
adjustment mode.
The set adjustment value is displayed on the copy quantity display.
The set adjustment value is displayed on the copy quantity display.
3) Make a copy and measure the void amount of image rear edge.
4) If the measurement value is out of the specified range, change the
set value and repeat the adjustment procedure.
The default value is 50.
The default value is 50.
(3) Center offset adjustment
1) Set the self-made test chart for the center position adjustment so
that its center line is aligned with the center mark of the document
guide.
guide.
• Test chart for the center position adjustment.
Draw a line at the center of A4 or 8 1/2" x 11" paper in the paper
transport direction.
transport direction.
2) Execute TC 50-10 to select the print center offset (cassette paper
feed) adjustment mode.
The set adjustment value is displayed on the copy quantity display.
The set adjustment value is displayed on the copy quantity display.
3) Make a copy and check that the copied center line is properly
positioned.
The standard value is 0 ±2mm from the paper center.
The standard value is 0 ±2mm from the paper center.
4) If the measured value is out of the specified range, change the set
value and repeat the adjustment procedure.
When the set value is increased by 1, the copy image is shifted by
0.1mm toward the rear frame.
When the set value is increased by 1, the copy image is shifted by
0.1mm toward the rear frame.
• For the manual paper feed, change the manual paper feed
adjustment mode and perform the similar procedures.
• Since the document center offset is automatically adjusted by the
CCD which scan the reference lines (F/R) on the back of document
guide, there is no need to adjust manually.
guide, there is no need to adjust manually.
2. Copy density adjustment
A. Copy density adjustment timing
The copy density adjustment must be performed in the following cases:
• When maintenance is performed.
• When the developing bias/grid bias voltage is adjusted.
• When the optical section is cleaned.
• When a part in the optical section is replaced.
• When the optical section is disassembled.
• When the OPC drum is replaced.
• When the main control PWB is replaced.
• When the EEPROM on the main control PWB is replaced.
• When the memory trouble (U2) occurs.
B. Note for copy density adjustment
1) Arrangement before execution of the copy density adjustment
• Clean the optical section.
• Clean or replace the charger wire.
• Check that the voltage at the high voltage section and the
developing bias voltage are in the specified range.
5mm
10mm
Distance from the paper lead edge
to the image lead edge, H = 5mm
to the image lead edge, H = 5mm
Image loss, R = 4mm
B4 or 8 1/2
″
×
14
″
paper
A4 size rear edge
Scale image
Paper rear edge
Void amount (Standard value: 2 - 3mm)
Document guide
(Copy A)
(Copy B)
2.0mm or less
2.0mm or less
Copy image
Copy paper
folding line
folding line
Copy image
Copy paper
folding line
folding line
Shift
Shift
(Paper feed direction)
AL-1556/1566 ADJUSTMENTS 9 - 4
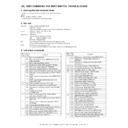
C. Necessary tool for copy density adjustment
• One of the following test charts:
UKOG-0162FCZZ, UKOG-0089CSZZ, KODAK GRAY SCALE
• B4 (14" x 8 1/2") white paper
• The user program AE setting should be "3."
Test chart comparison table
D. Features of copy density adjustment
For the copy density adjustment, the image data shift function provided
in the image process LSI is used.
in the image process LSI is used.
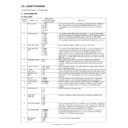
List of the adjustment modes
E. Copy density adjustment procedure
The copy density can be adjusted in 300dpi or in 600dpi.
For selection of modes, use the copy mode select key.
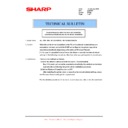
(1) Test chart (UKOG-0162FCZZ) setting
1) Place the test chart so that its edge is aligned with the A4 (Letter)
reference line on the document table. Then place a A4 (14" x
8 1/2") white paper on the test chart and close the document cover.
8 1/2") white paper on the test chart and close the document cover.
(2) Perform the adjustment in each mode.
1) Execute TC 46-01 (300dpi). To adjust in 600dpi, execute TC 46-
02.
2) Select the mode to be adjusted with the exposure mode select key.
Set the exposure level to 3 (center) for all adjustment. (Except for
the auto mode.)
the auto mode.)
3) Make a copy.
Check the adjustment level (shown in the above table) of the
exposure test chart (Sharp Gray Scale).
exposure test chart (Sharp Gray Scale).
(When too bright): Decrease the value displayed on the copy quantity
display.
(When too dark):
Increase the value displayed on the copy quantity
display.
display.
* The value can be set in the range of 1 - 99.
UKOG-
0162FCZZ
DENSITY
No.
0162FCZZ
DENSITY
No.
1
2
3
4
5
6
7
8
9
10
W
UKOG-
0089CSZZ
DENSITY
No.
0089CSZZ
DENSITY
No.
0.1
0.2
0.3
0.5 1.9
0
KODAK
GRAY
SCALE
GRAY
SCALE
1
2
3
4
19
A
Auto Mode
Brightness 1 step only
Manual Mode
Brightness 5 steps. Adjustment of only the center
brightness is made.
brightness is made.
Photo Mode
Brightness 5 steps. Adjustment of only the center
brightness is made.
brightness is made.
Manual T/S
mode
mode
Brightness 5 steps. Adjustment of only the center
brightness is made.
brightness is made.
T/S Auto mode
Brightness 1 step only
Main code
Sub code
Resolution for copy density adjustment
46
01
300dpi
02
600dpi
1
10
W
2
3
4
5
6
7
8
9
White paper
Test chart
Test chart
Adjustment
mode
Display
item
LED
Sharp gray chart
adjustment level
Auto mode
AE
COPY mode lamp
"3" is slightly
copied.
copied.
Text mode
TEXT
PRINT mode lamp
"3" is slightly
copied.
copied.
Photo mode
PHOTO SCAN mode lamp
"3" is slightly
copied.
copied.
Text T/S mode
TSTXT
PRINT mode lamp
SCAN mode lamp
SCAN mode lamp
"3" is slightly
copied.
copied.
Auto T/S mode
TSAE
COPY mode lamp
SCAN mode lamp
SCAN mode lamp
"3" is slightly
copied.
copied.
Sharp Gray Scale adjustment level
Non toner
save mode
save mode
Toner save
mode
mode
(2) Mode select key
TEXT
| | | | |
| | | | |
(1) Exposure mode, level display
1
10
W
2
3
4
5
6
7
8
9
Slightly copied.
Not copied.
1
10
W
2
3
4
5
6
7
8
9
Slightly copied.
Not copied.

