Read Sharp SD-EX100H (serv.man5) Service Manual online
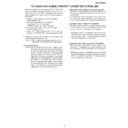
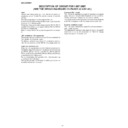
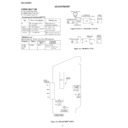
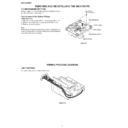
– 5 –
SD-EX100H
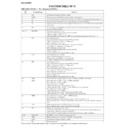
1
Rear Cabinet
1. Screw .................. (A1) x5
5-1
2. Screw .................. (A2) x7
2
Front Panel
1. Screw .................. (B1) x3
5-2
2. Screw .................. (B2) x2
3
Back Board
1. Screw ................. (C1) x7
5-2
2. Screw ................. (C2) x2
4
Top Panel
1. Screw ................. (D1) x2
5-3
2. Socket ................ (D2) x1
6-2
5
Tuner PWB
1. Socket ................. (E1) x1
5-3
6
Fuse PWB
1. Screw .................. (F1) x1
5-3
2. Socket ................. (F2) x2
7
Power Amp. PWB
1. Socket ................ (G1) x5
5-3
8
CD Servo PWB
1. Screw ................. (H1) x1
6-1
2. Socket ................ (H2) x9
9
Display PWB
1. Screw .................. (J1) x6
6-2
2. Socket ................. (J2) x7
10
CD Block Frame
1. Screw .................. (K1) x2
6-2
2. Screw .................. (K2) x2
11
Terminal PWB
1. Screw .................. (L1) x4
6-3
2. Socket ................. (L2) x1
12
1 Bit Amp. Unit
1. Screw ................. (M1) x3
6-3
13
Switch A / B PWB
1. Screw ................. (N1) x7
6-4
14
CD Mechanism Ass'y 1. Screw .................. (P1) x2
6-5
15
CD Mechanism
1. Screw ................. (Q1) x4
6-6
16
D/A Converter
1. Screw ................. (R1) x3
6-5
PWB
2. Screw ................. (R2) x2
3. Screw ................. (R3) x1
3. Screw ................. (R3) x1
17
1 Bit Amp. Shield
1. Screw .................. (S1) x2
7-1
Cover
2. Radiation Plate ... (S2) x1
3. Screw .................. (S3) x6
3. Screw .................. (S3) x6
18
1 Bit Amp. PWB
1. Screw .................. (T1) x4
7-2
DISASSEMBLY
STEP
REMOVAL
PROCEDURE
FIGURE
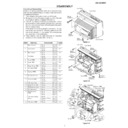
Figure 5-1
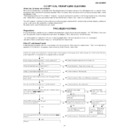
Caution on Disassembly
Follow the below-mentioned notes when disassembling
the unit and reassembling it, to keep it safe and ensure
excellent performance:
1. Take compact disc and minidisc out of the unit.
2. Be sure to remove the power supply plug from the wall
Follow the below-mentioned notes when disassembling
the unit and reassembling it, to keep it safe and ensure
excellent performance:
1. Take compact disc and minidisc out of the unit.
2. Be sure to remove the power supply plug from the wall
outlet before starting to disassemble the unit.
3. Take off nylon bands or wire holders where they need to
be removed when disassembling the unit. After servicing
the unit, be sure to rearrange the leads where they were
before disassembling.
If the screw of the wrong length is applied on the MD
mechanism unit (screw for mounting parts to the MD
mechanism chassis), it may contact the optical pickup
and cause the unit to malfunction.
the unit, be sure to rearrange the leads where they were
before disassembling.
If the screw of the wrong length is applied on the MD
mechanism unit (screw for mounting parts to the MD
mechanism chassis), it may contact the optical pickup
and cause the unit to malfunction.
4. Take sufficient care on static electricity of integrated
circuits and other circuits when servicing.
Figure 5-2
(A2)x6
ø3x8mm
ø3x8mm
(A2)x1
ø3x8mm
ø3x8mm
(A1)x5
ø3x65mm
ø3x65mm
Rear Cabinet
Front Panel
Top Panel
(B2)x1
ø3x12mm
ø3x12mm
(B1)x3
ø3x8mm
ø3x8mm
(B2)x1
ø3x12mm
ø3x12mm
(C2)x2
ø3x10mm
ø3x10mm
(C1)x7
ø3x8mm
ø3x8mm
Tuner PWB
Power
Transformer
PWB
Back Board
Front Panel
Top Panel
Figure 5-3
(D1)x2
ø3x12mm
ø3x12mm
(F1)x1
ø3x6mm
ø3x6mm
(G1)x2
(G1)x1
(F2)x1
(G1)x2
(E1)x1
(F2)x1
Terminal
PWB
PWB
Terminal
PWB
PWB
CD Servo PWB
Power Amp.
PWB
PWB
Power Amp.
PWB
PWB
Power Amp. PWB
Tuner PWB
Tuner PWB
Fuse PWB
Fuse PWB
Top Panel
Power
Transformer
PWB
SD-EX100H
– 6 –
Figure 6-1
Figure 6-2
Figure 6-3
Figure 6-4
Figure 6-5
Figure 6-6
(H1)x1
ø3x6mm
ø3x6mm
(H2)x1
(H2)x1
(H2)x2
(H2)x2
CD Mechanism
Block
Block
CD Mechanism
CD Servo PWB
CD
Servo
PWB
Servo
PWB
CD Motor PWB
Terminal PWB
Terminal
PWB
PWB
(H2)x3
Power
Transformer
PWB
(K1)x1
ø3x6mm
ø3x6mm
(K1)x1
ø3x6mm
ø3x6mm
(J1)x5
ø3x10mm
ø3x10mm
(J1)x1
ø3x10mm
ø3x10mm
(K2)x2
ø3x12mm
ø3x12mm
(D2)x1
(J2)x1
(J2)x2
(J2)x2
CD Block
Frame
Frame
Display PWB
1Bit Amp. Unit
Display
PWB
PWB
Terminal
PWB
PWB
(J2)x2
Display
PWB
PWB
Terminal
PWB
PWB
CD Mechanism
Block
Block
(M1)x1
ø3x6mm
ø3x6mm
(M1)x2
ø3x6mm
ø3x6mm
(L2)x1
(L1)x4
ø3x6mm
ø3x6mm
Terminal
PWB
PWB
1Bit Amp. Unit
Power
Transformer
PWB
(N1)x3
ø2.6x8mm
ø2.6x8mm
(N1)x4
ø2.6x8mm
ø2.6x8mm
Top Panel
Switch B PWB
Switch A PWB
(P1)x2
ø3x10mm
ø3x10mm
CD Mechanism
Ass'y
Ass'y
CD Block
Frame
Frame
(R1)x3
ø3x10mm
ø3x10mm
(R2)x1
ø3x6mm
ø3x6mm
(R2)x1
ø3x6mm
ø3x6mm
(R3)x1
ø3x6mm
ø3x6mm
D/A Converter
PWB
Shield Case,A,
D/A Converter
Shield Case,B,
D/A Converter
(Q1)x4
ø2.6x10mm
ø2.6x10mm
CD Mechanism
– 7 –
SD-EX100H
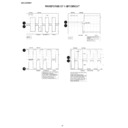
Figure 7-2
Figure 7-1
(S3)x1
ø3x8mm
ø3x8mm
(S3)x1
ø3x6mm
ø3x6mm
(S1)x2
ø3x8mm
ø3x8mm
(S3)x1
ø3x6mm
ø3x6mm
(S3)x2
ø3x8mm
ø3x8mm
(S3)x1
ø3x8mm
ø3x8mm
(S2)x1
Washer
Washer
1Bit Amp.
Shield Cover
Shield Cover
(T1)x4
ø3x6mm
ø3x6mm
1Bit Amp. PWB
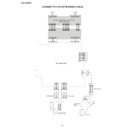
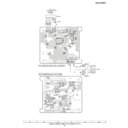
Figure 7-3
Figure 7-4
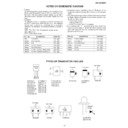
1
Woofer
1. Net Ass'y ............. (A1) x1
7-3
* (Note 1)
2. Woofer Ring ........ (A2) x1
3. Screw .................. (A3) x4
3. Screw .................. (A3) x4
7-4
4. Chip ..................... (A4) x2
2
Tweeter
1. Screw Special ..... (B1) x3
7-4
* (Note 2)
2. Chip ..................... (B2) x2
STEP
REMOVAL
PROCEDURE
FIGURE
* (Note 1)
The speaker box should not be damaged. Put the speaker on a cloth
when disassembling it.
The speaker box should not be damaged. Put the speaker on a cloth
when disassembling it.
1. Insert a wide flat-head screwdriver into
1
, and lift the woofer
slowly.
2. Insert the screwdriver into
2
(2 points), and lift the woofer slowly.
3. In the same manner, move the woofer up slowly at
3
(2 points).
(Note) Seek assistance so as not to damage the woofer.
* (Note 2)
Loosen screws located in the outer periphery. Do not remove the
inner screws that fix the speaker magnet. The tweeter may be
damaged.
* (Note 2)
Loosen screws located in the outer periphery. Do not remove the
inner screws that fix the speaker magnet. The tweeter may be
damaged.
(A1)x1
(A2)x1
Speaker Box
Screw Driver
Cloth
1
2
3
3
2
(B1)x3
ø4x20mm
ø4x20mm
(A3)x4
ø4x20mm
ø4x20mm
Speaker
Box
Tweeter
Woofer
(B2)x1
(B2)x1
(A4)x1
(A4)x1

