Read JBL LS CENTER Service Manual online
33
28
16
31
15
8
11
7
18
2
10
23
5
9
1
30
4
22
29
6
24
12
20
25
17
21
13
26
3
32
19
14
27
26
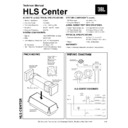
EXPLODED VIEW
Technical Manual
LS CENTER
LS
CENTER
7/08
Harman Consumer Group, Inc., 250 Crossways Park Drive, Woodbury, New York 11797
ITEM PART
NO.
DESCRIPTION
QTY.
Screw, LF/UHF Faceplate 3 x 12PA
4
Screw, Woofer 4 x 25FA
8
Screw, Crossover Network 3 x 20BA
11
Screw, Terminal Cup 3 x 15BA
4
29 P07980000
Grille Cup
8
30 P08170000
Gasket, UHF
1
31 Not for Sale
Label
1
32 P08660000
Foot
4
33 P05930002
Terminal Cup w/Binding Posts
1
34 Visit www.jbl.com
LS series Owner’s Manual
1
35 P00490002
Warranty Card
1
36 M00050020
Spike Foot Set
1
37 M00050021
Coaster Set
1
38 M00050019
Packing Set
1
39 P08540000
Outer Carton
1
ITEM PART
NO.
DESCRIPTION
QTY.
1
U00700001
UHF Tweeter
1
2
U00600000
HF Tweeter
1
3
U00670001
6–1/2" Woofer
2
4, 5
M00050014
LF/UHF Faceplate w/Gasket
1
6 –12
M00050015
HF Horn Assembly
1
13,14
M00050016
Trim Ring, Woofer w/Felt Gasket
2
15
Not for Sale
Label
1
16
Not for Sale
Label
1
17
P07950000
Front Grille
1
18
Not for Sale
LS Center Cabinet
1
19
P02780000
Insert Nut
4
20
P05750025
Crossover Network
1
21,22
P08160001
JBL Logo
1
23–28
M00050018
Screw Set Includes the Following:
1
Screw, UHF #6-32 x 3/8BM
4
Screw, LF Horn 4 x 20BA
6
SERVICE NOTES
1) Remove the grille.
2) Access to the woofer and crossover network is accomplished by gently prying the woofer trim ring out of the counterbore, which is attached with a friction fit, using a small, flat-blade screw-
2) Access to the woofer and crossover network is accomplished by gently prying the woofer trim ring out of the counterbore, which is attached with a friction fit, using a small, flat-blade screw-
driver or similar tool. The four Phillips screws will then be visible.
3) Access to the HF/UHF sections is accomplished by first extracting the upper four rubber grille retainers. This can be accomplished by a) inserting a long screw with coarse threads into the cup
hole, thread the screw and extract the cup or b) carefully pulling them out of their cavities with long-nosed pliers or a similar tool. It’s possible each grille cup could be damaged since the cups
are affixed with RTV (a silicon seal). Each cavity should be cleaned out with a 1/4" drill bit before the Phillips head screw is turned. (Power tools are not recommended here). Remove the four
screws, then pull off the faceplate w/UHF driver attached to it.
are affixed with RTV (a silicon seal). Each cavity should be cleaned out with a 1/4" drill bit before the Phillips head screw is turned. (Power tools are not recommended here). Remove the four
screws, then pull off the faceplate w/UHF driver attached to it.
4) Access LF, UHF tweeter or crossover network as needed.
5) Woofer Replacement: Make sure the woofer is exactly centered in the counterbore, otherwise the trim ring will not fit in place.
5) Woofer Replacement: Make sure the woofer is exactly centered in the counterbore, otherwise the trim ring will not fit in place.
Display


